Milvus向量数据库之以图搜图
一、介绍
Milvus 创建于 2019 年,其目标只有一个:存储、索引和管理由深度神经网络和其他机器学习 (ML) 模型生成的大量嵌入向量。
作为专门设计用于处理对输入向量的查询的数据库,它能够以万亿级对向量进行索引。与现有关系数据库主要按照预定义模式处理结构化数据不同,Milvus 是自下而上设计的,用于处理从非结构化数据转换的嵌入向量。
随着互联网的发展和发展,非结构化数据变得越来越普遍,包括电子邮件、论文、物联网传感器数据、Facebook 照片、蛋白质结构等等。为了使计算机理解和处理非结构化数据,使用嵌入技术将这些数据转换为向量。Milvus 存储并索引这些向量。Milvus 能够通过计算两个向量的相似距离来分析它们之间的相关性。如果两个嵌入向量非常相似,则意味着原始数据源也相似。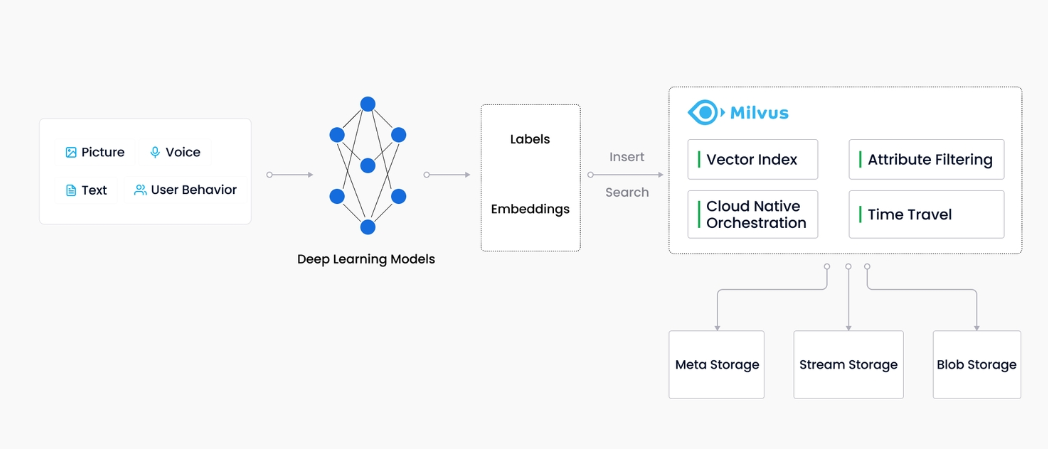
来源:
https://milvus.io/docs/v2.1.x/overview.md
milvus支持的索引和指标
索引:
Milvus 支持的大多数向量指数类型都使用近似最近邻搜索 (ANNS),包括:
FLAT:FLAT最适合在百万规模的小型数据集上寻求完全准确和准确的搜索结果的方案。
IVF_FLAT:IVF_FLAT是基于量化的索引,最适合在准确性和查询速度之间寻求理想平衡的场景。
IVF_SQ8:IVF_SQ8是基于量化的索引,最适合寻求显著减少磁盘、CPU 和 GPU 内存消耗的方案,因为这些资源非常有限。
IVF_PQ:IVF_PQ是基于量化的索引,最适合以准确性为代价寻求高查询速度的方案。
HNSW:HNSW 是基于图形的索引,最适合对搜索效率有较高要求的场景。
ANNOY:ANNOY是基于树的索引,最适合寻求高召回率的方案。
相似性指标:
欧几里得距离(Euclidean distance、L2):该指标通常用于计算机视觉(CV)领域。
内积(Inner product、IP):该指标通常用于自然语言处理(NLP)领域。
广泛用于二进制嵌入的指标包括:
Hamming:这个指标通常用于自然语言处理(NLP)领域。
Jaccard:这个指标通常用于分子相似性搜索领域。
Tanimoto:这个指标通常用于分子相似性搜索领域。
Superstructure:此指标通常用于搜索分子的类似上层结构。
Substructure:此指标通常用于搜索分子的类似子结构。
用途
图像相似性搜索:图像可搜索并立即从海量数据库中返回最相似的图像。
视频相似性搜索:通过将关键帧转换为矢量,然后将结果输入 Milvus,可以近乎实时地搜索和推荐数十亿个视频。
音频相似性搜索:快速查询语音、音乐、音效等海量音频数据,并显示相似声音。
分子相似性搜索:对指定分子进行超快速的相似性搜索、子结构搜索或上层结构搜索。
推荐系统:根据用户行为和需求推荐信息或产品。
问答系统:交互式数字QA聊天机器人,可自动回答用户问题。
DNA序列分类:通过比较相似的DNA序列,在毫秒内准确梳理出基因的分类。
文本搜索引擎:通过将关键字与文本数据库进行比较,帮助用户找到他们正在寻找的信息。
二、安装及简单使用
1、单机版下载安装
手动或使用以下命令下载并保存。milvus-standalone-docker-compose.ymldocker-compose.yml
$ wget https://github.com/milvus-io/milvus/releases/download/v2.1.4/milvus-standalone-docker-compose.yml -O docker-compose.yml
启动
在与文件相同的目录中,通过运行以下命令启动 Milvus:docker-compose.yml
sudo docker-compose up -d
sudo docker-compose ps
停止
sudo docker-compuse down
sudo rm -rf  volumes
2、python版sdk
pip install pymilvus==2.1.3
3、示例
from pymilvus import (
    connections,
    utility,
    FieldSchema,
    CollectionSchema,
    DataType,
    Collection,
)
# 建立连接
connections.connect("default", host="localhost", port="19530")
# 创建集合
fields = [
    FieldSchema(name="pk", dtype=DataType.INT64, is_primary=True, auto_id=False),
    FieldSchema(name="random", dtype=DataType.DOUBLE),
    FieldSchema(name="embeddings", dtype=DataType.FLOAT_VECTOR, dim=8)
]
schema = CollectionSchema(fields, "hello_milvus is the simplest demo to introduce the APIs")
hello_milvus = Collection("hello_milvus", schema)
# 向集合中插入向量
import random
entities = [
    [i for i in range(3000)],  # field pk
    [float(random.randrange(-20, -10)) for _ in range(3000)],  # field random
    [[random.random() for _ in range(8)] for _ in range(3000)],  # field embeddings
]
insert_result = hello_milvus.insert(entities)
# 在实体上构建索引
index = {
    "index_type": "IVF_FLAT",
    "metric_type": "L2",
    "params": {"nlist": 128},
}
hello_milvus.create_index("embeddings", index)
# 将集合加载到内存并执行向量相似性搜索
hello_milvus.load()
vectors_to_search = entities[-1][-2:]
search_params = {
    "metric_type": "L2",
    "params": {"nprobe": 10},
}
result = hello_milvus.search(vectors_to_search, "embeddings", search_params, limit=3, output_fields=["random"])
# 执行矢量查询:
result = hello_milvus.query(expr="random > -14", output_fields=["random", "embeddings"])
# 执行混合搜索:
result = hello_milvus.search(vectors_to_search, "embeddings", search_params, limit=3, expr="random > -12", output_fields=["random"])
# 按主键删除实体:
expr = f"pk in [{ids[0]}, {ids[1]}]"
hello_milvus.delete(expr)
# 删除集合:
utility.drop_collection("hello_milvus")
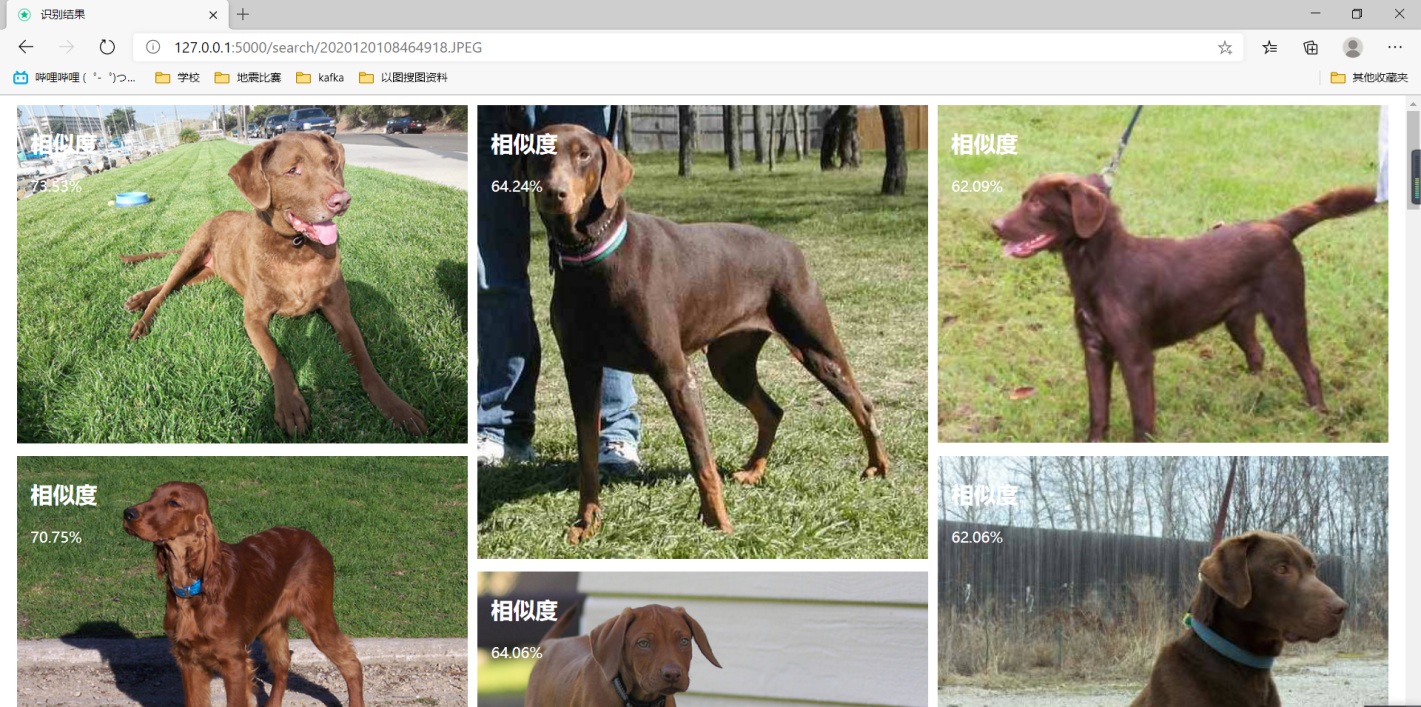
三、以图搜图的实现:
以图搜图的含义是用一张图片搜索与其相似的图片并进行展示,训练集用来训练,每一张图片用VGG16提取特征值并存入milvus数据库。存储VGG16对每张图进行模型建立,将每张图的数据进行存储模型数据,并存储当前图片的路径
当使用web页面显示搜图网页,用户点击文件上传之后,走相同的VGG16模型建立,从数据库中搜索最相似的图片。当用户拿测试集图片进行比对,会走相同的VGG16模型提取特征值,并利用欧式距离计算相似度。
项目完整地址:https://gitee.com/zhengtianqi/learn-samples/tree/master/pic-search
1、建立图片模型,采用VGG16模型
# -*- coding: utf-8 -*-
import keras
import numpy as np
from numpy import linalg as LA

from keras.applications.vgg16 import VGG16
from keras.preprocessing import image
from keras.applications.vgg16 import preprocess_input


class VGGNet:
    def __init__(self):
        keras.backend.clear_session()
        self.input_shape = (224, 224, 3)
        self.weight = 'imagenet'
        self.pooling = 'max'
        self.model = VGG16(weights=self.weight,
                           input_shape=(self.input_shape[0], self.input_shape[1], self.input_shape[2]),
                           pooling=self.pooling, include_top=False)
        self.model.predict(np.zeros((1, 224, 224, 3)))

    '''
    Use vgg16 model to extract features
    Output normalized feature vector
    '''
    def extract_feat(self, img_path):
        img = image.image_utils.load_img(img_path, target_size=(self.input_shape[0], self.input_shape[1]))
        img = image.image_utils.img_to_array(img)

        img = np.expand_dims(img, axis=0)
        img = preprocess_input(img)
        feat = self.model.predict(img)
        norm_feat = feat[0] / LA.norm(feat[0])
        return norm_feat
2、建立集合实体
from pymilvus import CollectionSchema, FieldSchema, DataType
from pymilvus import Collection
from pymilvus import utility

from utils.Connect import connect

pic_id = FieldSchema(
    name="pic_id",
    dtype=DataType.INT64,
    is_primary=True,
)
pic_name = FieldSchema(
    name="pic_name",
    dtype=DataType.VARCHAR,
    max_length=1200,
)
pic_url = FieldSchema(
    name="pic_url",
    dtype=DataType.VARCHAR,
    max_length=1200,
)
pic_price = FieldSchema(
    name="pic_price",
    dtype=DataType.VARCHAR,
    max_length=1200,
)
pic_vector = FieldSchema(
    name="pic_vector",
    dtype=DataType.FLOAT_VECTOR,
    dim=512
)
schema = CollectionSchema(
    fields=[pic_id, pic_name, pic_url, pic_price, pic_vector],
    description="Test pic search"
)
collection_name = "pic"


def create_collection():
    connect()
    if utility.has_collection(collection_name):
        utility.drop_collection(collection_name)
    collection = Collection(
        name=collection_name,
        schema=schema,
        using='default',
        shards_num=2,
    )
    collection.release()
3、训练数据
import os
from time import *
from PIL import Image as Im

from dao.PicDao import insertBatch
from service.create_collection import create_collection
from utils.VggNet import VGGNet

def IsValidImage(pathfile):
    bValid = True
    try:
        Im.open(pathfile).verify()
    except:
        bValid = False
    return bValid

def train(url):
    begin_time = time()
    vgg = VGGNet()
    create_collection()

    data = []
    pic_id = []
    pic_name = []
    pic_url = []
    pic_price = []
    pic_vector = []

    cnt = 1
    for root, dirs, files in os.walk(url):
        for file in files:
            path = os.path.join(root, file)
            if IsValidImage(path):
                vector = vgg.extract_feat(path)
                pic_id.append(cnt)
                pic_name.append(file)
                pic_url.append(path)
                pic_price.append("100")
                pic_vector.append(vector)
                cnt += 1
    data.insert(0, pic_id)
    data.insert(1, pic_name)
    data.insert(2, pic_url)
    data.insert(3, pic_price)
    data.insert(4, pic_vector)
    insertBatch(data)

    end_time = time()
    run_time = end_time - begin_time
    print('该循环程序运行时间:', run_time)
4、搜索相似图片
from PreApp import base_dir
from dao.PicDao import selectByIds
from service.create_collection import collection_name, schema
from utils.Connect import connect
from utils.VggNet import VGGNet
from pymilvus import Collection


def search_pic(path):
    vgg = VGGNet()
    print(path)
    test_vectors = vgg.extract_feat(path)
    # 涉及的向量6个数
    search_params = {"metric_type": "L2", "params": {"nprobe": 10}}
    connect()
    collection = Collection(collection_name)
    collection.load()
    results = collection.search(
        data=[test_vectors],
        anns_field="pic_vector",
        param=search_params,
        limit=10,
        expr=None,
        consistency_level="Strong"
    )

    collection.release()
    result = []
    ids = []
    for t in results[0]:
        dict = {}
        dict['id'] = t.id
        dict['distance'] = t.distance
        result.append(dict)
        ids.append(str(t.id))
    res = selectByIds(ids)
    for t in result:
        for s in res:
            if s['pic_id'] == t['id']:
                t['name'] = s['pic_name']
                t['pic_price'] = s['pic_price']
                t['pic_url'] = s['pic_name']
    return result


if __name__ == '__main__':
    search_pic("E:\zhengtianqi\git\search-for-pictures\data2\ILSVRC2012_img_val\cat.91.jpg")
结果: